


Upload
This is the starting point for getting your activities from your PC or Mac to LogMyTraining. It is also the starting point for retrieving Activities from your Garmin Connect account.
It's best to use a Wi-Fi connection. If you are copying data from a PC and Mac and don't have a Wi-Fi network, but your PC or Mac has Wi-Fi, you can create your own Wi-Fi network following these instructions.
LogMyTraining will first try to use a Wi-Fi connection if available. If you are not connected to a Wi-Fi network, it will attempt to open a connection using your carrier data network. This will work fine (although slower) with Garmin Connect but may not work with all carriers for copying activities from your PC or Mac; in particular if your carrier doesn't assign an externally visible address to your iPhone. In this case you will not be able to contact the iPhone via the carrier network and must use a Wi-Fi connection.
Please note that using the carrier network will be much slower and could incur additional costs depending on your contract with your cellular carrier. LogMyTraining indicates whether it is using a Wi-Fi connection or the carrier network.
FTP
Tap the "FTP" button to copy Polar "hrm/pdd" files, Garmin "tcx" History files and SportTracks "fitlog" data to the training log. The button will indicate whether you are connecting via Wi-Fi or via your carrier network. More detailed information can be found when tapping the FTP button.
Garmin Connect
Tap the Garmin Connect button to download Activities directly from your account on the Garmin Connect website. More information can be found when tapping this button.
Creating a Wi-Fi Network
In case you don't have a Wi-Fi router or access to a Wi-Fi network, but you do have a computer equipped with Wi-Fi, you can create your own network which can be used to transfer data to this app.
Creating a Ad-Hoc Wi-Fi Network under Windows
On Windows Vista and Windows 7, Microsoft's instructions to set up an ad-hoc network are here. The steps consist of:
- opening the "Network and Sharing Center"
- Setting up a connection or network
- Set up a wireless ad-hoc (computer-to-computer) network
- fill in form with name of network you want to create. As for security, the easiest is to chose none as you are not really transferring any sensitive data. If you want encryption try WPA2 or if it's not working try WEP.
Note: In Windows 7 Starter Edition you can access the the ad-hoc Wireless connection wizard by going to the Start Menu and searching for "ad-hoc".
Window's XP instructions can be found here. The steps include:
- Open the control panel
- Chose "Network and Internet connections" or "Network Connections"
- Right-click the wireless connection and select "Properties"
- Choose the "Wireless Networks" tab
- Click the "Advanced button". Select "Computer-to-computer (ad-hoc) networks only" option and make sure "Automatically connect to non-preferred networks" is unchecked, then click "Close".order to ease the configuration.
- Back on the Wireless Networks tab, Click "Add"
- Invent a name for your ad-hoc network and chose either no security or WEP security
- Clear the "The key is provided for me automatically "check box and select the "This is a computer-to-computer (ad-hoc) network" check box
- Remove or disable any other network connections and repeat the procedure
- You will have a better chance if your wireless card uses 802.11b or g. When you first open the properties of the Network Connection in the General tab there should be a "Configure" button. Depending on your hardware and drivers you may have the possibility configure the Preferred Band or Wireless Mode. Choose 802.11b or g.
- If indeed the ad-hoc network is visible on the iPhone and you chose it, wait a minute or so for both Windows and iPhone to create the connection. You will see it is finally connected when the Windows Network Connection states that it is "connected".
Creating a Ad-Hoc Wi-Fi Network under Mac OS X
Macworld has a good article on setting up an ad-hoc Wi-Fi network under Mac OS X.
The steps consist of:
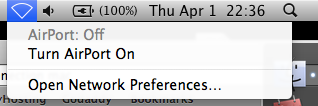
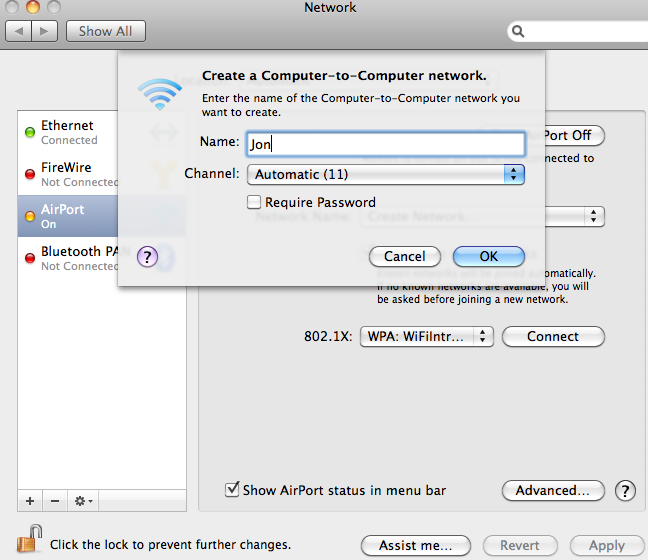
- Open System Preferences/Network
- Click "Turn Airport On"
- Under "Network Name" choose "Create Network".
- Give the network a name and choose a password if desired
- The network should now be visible on your iPhone
Note: You can also do this using the AirPort icon on the menu bar.